

Welcome to your sewing sanctuary, where creativity flows as freely as the thread from your machine. Let’s explore some clever organization ideas to transform your sewing room into an efficient and inspiring space.
1. Label Everything

Label shelves, bins, and drawers to quickly find what you need without digging through piles of supplies. This simple step has saved me countless hours of searching for the right materials. It also helps me keep track of what I have on hand, so I don’t accidentally buy duplicates. I wish I had implemented this system sooner in my sewing journey!
A few suggestions:
- Adhesive Label Maker: Organize effortlessly by labeling shelves and bins with a simple, easy-to-use adhesive label maker.
- Clear Storage Bins: Maximize visibility and keep supplies neat with clear storage bins for easy identification and access.
- Stackable Drawer Organizers: Save space and streamline access by using stackable drawer organizers in your sewing room.


2. Utilize Under-Table Storage

Maximize your space by storing bins or baskets under your sewing table. I like to keep my less frequently used fabrics here, out of sight but easily accessible. This also prevents them from gathering dust and fading in direct sunlight. I’ve found this is the perfect spot for storing larger cuts of fabric that I’m saving for special projects.
Check if these fit your needs:
- Plastic Storage Bins with Lids: Organize your fabrics securely with stackable bins, keeping them clean and easily accessible.
- Wire Storage Baskets: Maximize space and visibility with open wire baskets ideal for fabric storage.
- Rolling Storage Cart: Add mobility to your storage with a rolling cart, perfect for shifting supplies effortlessly.


3. Make Use of Vertical Space

Utilize vertical space by installing tall shelves or hanging baskets. This has allowed me to keep my floor space clear while maximizing storage. When working with clients, I often recommend this to make smaller spaces more efficient. My clients are always amazed at how much storage they gain by going vertical.
Consider these options:
- Tall Shelving Unit: Maximize storage with a tall shelving unit, keeping your sewing room neat and organized.
- Hanging Storage Baskets: Hang storage baskets for easy access to sewing supplies, saving space and reducing clutter.
- Adjustable Wall Hooks: Install adjustable wall hooks for versatile storage options, perfect for a variety of sewing tools.
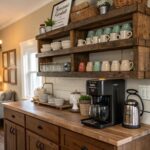


4. Incorporate Open Shelving

Install open shelves to display your beautiful fabric collection while keeping it within arm’s reach. I love how this approach adds both function and a splash of color to my room. It transforms the fabric into a work of art in itself. I believe that seeing my fabric inspires me to create new and exciting things.
Useful items to consider:
- Wooden Wall-Mounted Shelves: Add style and accessibility to your sewing room with elegant open wooden wall shelves.
- Adjustable Metal Shelving Unit: Organize your fabric collection with versatile and sturdy adjustable metal shelves.
- Floating Bookshelf Set: Create a chic and convenient display for your fabrics using minimalist floating bookshelves.
5. Personalize with Decor

Add personal touches like artwork, plants, or a comfy chair to make your sewing room truly yours. I find that these elements make my space feel more welcoming and enjoyable to spend time in. A few well-chosen decorations can completely transform the atmosphere. I chose to add a gallery wall with some of my favorite art prints.
May just do the trick:
- Framed Wall Art Set: Add aesthetic appeal with a framed wall art set to personalize your sewing room beautifully.
- Indoor Potted Plant: Bring life to your sewing space with vibrant indoor potted plants and feel refreshed.
- Comfortable Accent Chair: Relax during sewing breaks with a stylish and comfy accent chair for added charm.
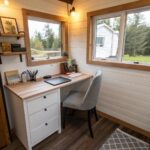
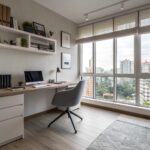
6. Incorporate Natural Light

Position your workspace near a window to take advantage of natural light. This not only reduces eye strain but also makes the space feel more open and inviting. When I work with clients, I always encourage them to maximize natural light in their sewing rooms. I feel that it’s an essential element for a productive and enjoyable sewing experience.
A few choices to try:
- Adjustable Desk Lamp with Natural Light Bulb: Enhance your sewing space’s lighting with an adjustable desk lamp, reducing eye strain effectively.
- Window Sheer Curtains: Use sheer curtains to gently diffuse sunlight, maintaining brightness while ensuring privacy.
- Ergonomic Sewing Chair with Lumbar Support: Improve comfort and posture with a supportive chair, perfect for long sewing sessions.


7. Design a Sewing Supply Wall

Create an inspiring display by arranging your sewing supplies on a wall, turning organization into art. I find that showcasing my tools and materials this way keeps me motivated and makes the space more inviting. For one client, I arranged vintage sewing notions in shadow boxes to create a unique and personalized display. I thought it was a great way to celebrate the history of sewing and add character to the space.
Some ideas to consider:
- Wall-Mounted Pegboard Organizer: Transform your sewing space with a versatile pegboard, keeping tools organized and accessible.
- Thread Rack Holder: Display your thread collection in style, making it easy to choose the perfect color anytime.
- Wall Hooks for Fabric: Hang and showcase your favorite fabrics effortlessly, adding both function and flair to your wall.
8. Roll with Portable Carts

Use a rolling cart to store frequently used supplies, making it easy to move them around as needed. This has been a game-changer for me, providing flexibility and keeping my workspace clutter-free. I can easily roll it over to my cutting table or sewing machine, depending on what I’m working on. I’m certain it is one of the best organization tools I have.
You might give these a try:
- 3-Tier Rolling Storage Cart: Transform your sewing space with easy access and mobility for all your essentials.
- Metal Utility Rolling Cart: Keep fabrics and tools organized and accessible with a sturdy, easy-to-move cart.
- Mobile Organizer Cart with Bins: Enhance your crafting area with a flexible storage solution featuring multiple bins.
9. Install a Fold-Down Table

A fold-down table provides additional workspace without taking up permanent space. I use mine for extra cutting space during larger projects and fold it away when not needed. This is an especially handy solution for those with limited square footage. I’ve found that it’s perfect for when I need to spread out large pattern pieces.
Give these a look:
- Wall-Mounted Drop-Leaf Table: Maximize your sewing space with a convenient fold-down table that saves room effortlessly.
- Foldable Sewing Table: Enhance your workspace with a versatile foldable table designed for sewing projects and easy storage.
- DIY Folding Workbench Kit: Create your own folding table with a complete kit, perfect for personalized sewing room setups.
10. Use Clear Storage Containers

Clear containers allow you to see your supplies at a glance, making it easier to find exactly what you need. In my experience, this reduces the temptation to buy duplicates of items I already own. For my clients, I often suggest clear containers for storing notions, threads, and smaller fabric scraps. I have found that they are more likely to use what they have when they can see it.
Maybe worth checking out:
- Clear Plastic Storage Bins with Lids: Organize your sewing essentials effortlessly; see everything clearly without opening each box.
- Stackable Clear Storage Boxes: Maximize your space by stacking these clear boxes; keep your sewing room tidy and efficient.
- Transparent Storage Totes: Quickly locate your sewing supplies with these handy transparent totes; simplify your organization.
11. Organize by Project

Store materials and patterns for each project in separate bins or bags. This helps me keep everything organized and ensures I have all the necessary components ready when I’m ready to start. I often use clear plastic bags with zippers to keep the fabric clean and wrinkle-free. I find this system incredibly useful for keeping my sewing projects on track.
These products might help:
- Clear Storage Bins with Lids: Keep your sewing projects neat and visible with clear storage bins equipped with secure lids.
- Fabric Storage Bags: Protect and organize your fabrics with dedicated storage bags designed for easy accessibility and stacking.
- Label Maker: Create custom labels for each project bin to easily identify and sort your sewing materials.
12. Create a Dedicated Cutting Station

Designate a specific area for cutting fabric, ensuring you have a large enough surface for your projects. My cutting station is the heart of my room, allowing for smooth workflow and creativity. A large, self-healing mat is a must-have for protecting your table surface and extending the life of your rotary cutter. I think it is best to invest in a high-quality mat that will last for years to come.
Items that may come in handy:
- Large Self-Healing Cutting Mat: Protect your surfaces and ensure precise cuts with a reliable, self-healing cutting mat.
- Ergonomic Fabric Scissors: Enjoy comfortable and accurate cutting with ergonomic scissors for all your sewing projects.
- Adjustable Cutting Table: Enhance your sewing room with an adjustable table for the optimal cutting height and comfort.
13. Pegboard Perfection

Hang a pegboard on your wall to keep tools like scissors, rulers, and rotary cutters within easy reach. I find this not only frees up drawer space but also adds a touch of industrial charm to my sewing area. I often recommend this to my clients, especially those with smaller sewing spaces. I consider it a very versatile and customizable storage solution.
Explore these options:
- Pegboard Organizer Kit: Organize your tools with ease using this versatile pegboard kit for maximum efficiency.
- Metal Pegboard Hooks: Add flexibility to your storage solution with sturdy metal hooks for your pegboard.
- Pegboard Storage Bins: Keep small items tidy and accessible with these handy pegboard storage bins.
14. Install Drawer Dividers

Use dividers in your drawers to keep small items like buttons and threads separated. This small change has made it much easier for me to find what I need without rummaging through clutter. I like to use adjustable dividers so that I can customize the compartments to fit different sized items. I feel that this keeps me from becoming overwhelmed by the mess.
Some handy options:
- Adjustable Drawer Dividers: Organize your sewing supplies easily with adjustable dividers that fit any drawer size.
- Wooden Drawer Organizers: Enhance drawer aesthetics and functionality with wooden organizers for neat storage of buttons and threads.
- Clear Plastic Divider Inserts: Keep small items visible and sorted with clear plastic divider inserts in your drawers.
15. Use a Wall Calendar

Keep track of deadlines and project milestones with a wall calendar. This simple addition has helped me stay on schedule and manage my sewing projects more effectively. I like to use a color-coded system to differentiate between personal and client projects. I find that this keeps me focused and prevents me from missing important deadlines.
Products that could assist:
- Large Dry Erase Wall Calendar: Stay organized with a reusable calendar. Plan your sewing projects efficiently and clearly.
- Magnetic Monthly Calendar Board: Enhance your organization with a magnetic calendar. Manage deadlines and milestones effortlessly.
- Colorful Wall Calendar Stickers: Use stickers for visual reminders. Highlight important sewing deadlines and dates easily.
16. Hang a Thread Rack

A wall-mounted thread rack keeps your spools organized and untangled. I find this keeps my threads visible and readily available, adding a colorful element to the room’s decor. When working with clients, I often suggest arranging the threads by color to create a visually appealing display. I believe that it can inspire creativity and make the sewing room feel more inviting.
Possibly helpful picks:
- Wall-Mounted Thread Organizer: Keep your threads organized and easily accessible with a sleek wall-mounted thread organizer.
- Multi-Color Thread Rack: Add color and order to your sewing room with a vibrant multi-color thread rack.
- Steel Wire Thread Holder: Ensure durability and visibility in your sewing area with a sturdy steel wire thread holder.
17. Create a Cozy Sewing Nook

Transform a corner of your room into a cozy sewing nook with a comfy chair and good lighting. This is where I retreat for more focused work, and it feels like a little creative sanctuary. I like to have a soft blanket and a cup of tea nearby to enhance the cozy atmosphere. I believe everyone deserves a dedicated space for creativity and relaxation.
Might be a good match:
- Comfy Upholstered Armchair: Enhance your sewing nook with a plush armchair for ultimate comfort during creative sessions.
- Adjustable Floor Lamp: Illuminate your projects with an adjustable floor lamp that offers excellent lighting for detailed work.
- Compact Side Table: Add a compact side table to keep all your sewing essentials within arm’s reach while you work.
18. Repurpose Household Items

Use items like kitchen spice racks or bathroom organizers to store small sewing supplies. This approach has made my space more functional without needing to invest in specialized storage solutions. I have found that old muffin tins are great for sorting buttons and beads. I consider this a creative and cost-effective way to organize my sewing room.
Check these products out:
- Stackable Kitchen Spice Rack: Organize your sewing supplies effortlessly with a versatile stackable spice rack. Maximize space efficiently.
- Clear Bathroom Organizer Bins: Find your threads easily by storing them in clear bathroom bins. Enhance visibility and access.
- Wall-Mounted Kitchen Organizer: Declutter your sewing area with a wall-mounted organizer. Keep small tools within easy reach.
19. Keep a Project Board

Use a corkboard or magnetic board to pin current projects, inspiration, and plans. Having a visual guide helps me stay organized and focused on my sewing goals. I like to include fabric swatches, pattern sketches, and inspirational images on my board. I’ve found that it helps me visualize my projects and stay motivated.
A few things you might like:
- Large Corkboard: Pin your sewing projects and inspiration on a spacious board to stay organized effortlessly.
- Magnetic Board with Clips: Display your sewing plans with ease using a functional magnetic board and handy clips.
- Decorative Push Pins: Add a pop of style and convenience to your board with these decorative push pins.
20. Create a Color-Coded Fabric Library

Sort your fabrics by color and store them on shelves or in clear bins to make selection easy and visually pleasing. In my own space, this approach not only brightens the room but also sparks ideas whenever I walk by. My clients often remark on how organized and inspiring my fabric storage is. I have found this system to be a real joy to maintain and use.
These products might be useful:
- Clear Storage Bins for Fabrics: Organize your fabric by color with clear bins for easy access and a tidy look.
- Adjustable Metal Shelving Unit: Maximize storage using an adjustable shelving unit to neatly display your colorful fabric collection.
- Colorful Fabric Labels: Use vibrant labels to categorize fabric easily, adding both function and flair to your library.


